
——————————————
Download a copy of this alert >
——————————————
Introduction
This bulletin describes the standard method for measuring drum contamination under production conditions as recommended by the Industrial Steel Drum Institute (ISDI). The test is a method to measure the cleanliness of drums during production. The advantage of this method is that it can be performed during production without disturbing the product flow. During the test, three drums are vacuum-cleaned with a specified vacuum cleaner using a long pipe. The contamination is gathered on a filter with a standard diameter and mesh size. The discoloration and increase in weight of the filter are an indication of the level of drum contamination.
Materials
- 1.5 horsepower shop vacuum cleaner (1.0-1.3 kW). The vacuum cleaner should blow approximately 11 U.S. gallons (40 litres) of air per second; when fitted with the extension tube and filter, the flow should be approximately four U.S. gallons (15 litres) per second.
- Flexible tube on the vacuum cleaner. To be used only for this test; flexible tubes are never flat inside and are easily contaminated if used for other purposes.
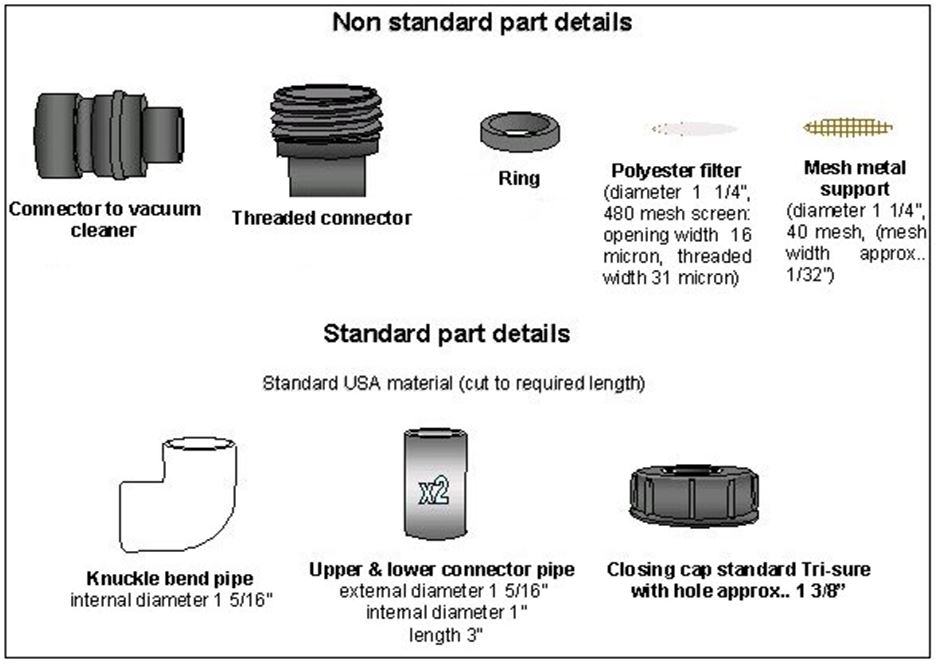
- Filter disks of polyester filter material. The disks should be pre-weighted to the nearest 0.1 milligram (mg). The disks must be stored in a glass jar or similar container to prevent exposure to dirt, dust and other airborne particulate. (Supplier filer sheet: Sefar; Internet: Sefar.com; Type: PET 1000-190-31-W-TW).
- Stainless steel extension tube that will reach to the bottom of a large drum.
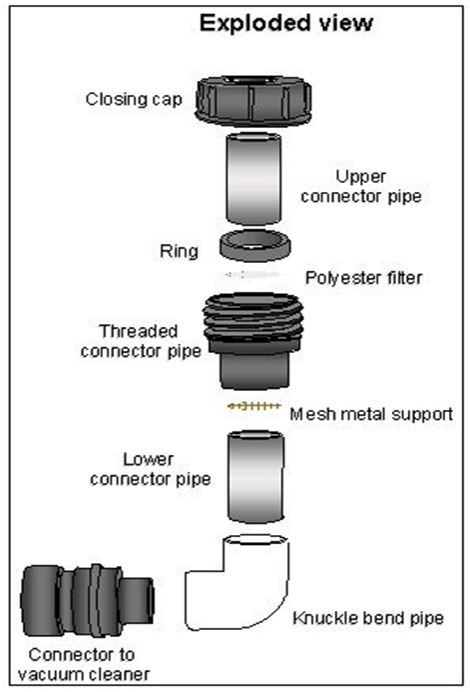
- Filter holder with couplings and a steel mesh to support the filter; see Image 1 for principle.
- Balance capable of measurements to the nearest 0.1 mg.
- Microscope slides approximately 2 inches by 3 inches, or any other translucent holder for the filters.
- Tweezers.
Test Procedure
Note: Before starting the test, purge the tubes of any particles by running the vacuum for three minutes and 15 seconds in open air without drums.
- Before inserting the filter in the holder, inspect it for any particulate contamination and verify that it has been properly weighed. If the filter is suspect, discard the disk and use another one.
- The steel mesh and filter should be inserted into the holder with the filter lying flat on the mesh. Connect the vacuum hose and close the unit by turning the cap.
- Randomly select three drums, and lift and drop each drum three times on the floor (not on rubber) to dislodge any loose particles from the sides and the head.
- Carefully remove the bung, taking care to avoid breaking away particulates from the closure threads.
- Carefully insert the vacuum extension tube to reach the bottom of the drum.
- Turn on the vacuum cleaner and carefully, without scraping the bottom, move the extension tube around the bottom chime. Once the circuit of the bottom is complete, move the tube in a zigzag pattern across the bottom to ensure that the whole bottom surface is vacuumed. Repeat this operation once more. This should take one minute per drum.
- Conduct the same procedure on the second and third drums. Make sure the vacuum cleaner is turned off between the drums to avoid unwanted material being sucked in.
- After completing the final drum, keep the vacuum cleaner running for 15 seconds, remove the tube from the drum, keep the end of the pipe in the air, and move and tap the flexible tube to get all particles out of the tube. Then switch off the motor.
- Keeping the extension tube vertical, remove the section holding the filter from the vacuum extension tube.
- Hold the connector over the filter. Tap lightly on the connector to dislodge any remaining particulates. Using tweezers, carefully remove the filter. Place the filter on the glass slide or holder.
- Place another slide on top (or close the holder) and securely seal with tape. Label with relevant information.
- The sample should then be removed from the slide (or holder) and weighed. If the test is performed in a laboratory setting where the filter will be weighed immediately, steps 10, 11 and 12 can be omitted.
- The difference between the before and after filter weight, divided by three, is the average weight of contamination per drum.
Precautions
- Avoid damage to the threads when opening the two-inch closure.
- Avoid contact between the opening threads and the extension tube.
- Avoid running the vacuum cleaner while the pipe is outside the container except for the 15 seconds after the last drum.
- Do not use the vacuum cleaner for any other purpose. If accidentally done, the flexible tube should be replaced because the old one is too severely contaminated.
- Avoid damage to the lining by careless use of the probe.
- Keep equipment clean at all times.
- Use the proper type of filter. Other types might reduce the airflow through the system and thus the cleaning efficiency.
Results
- Contamination per drum is expressed as:

- Residues can also be analyzed with a microscope.
Image 1: Picture of System
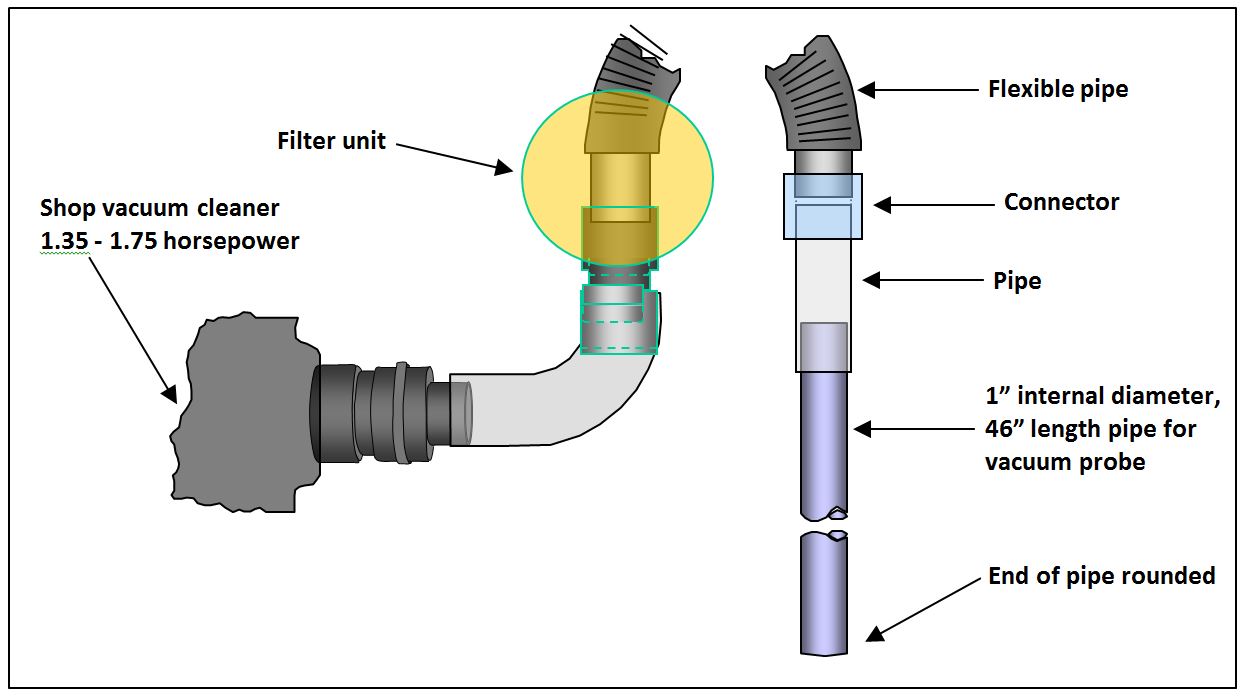
Image 2: Details of Filter Unit
Issued 01/14
This information is based on the Industrial Steel Drum Institute’s best knowledge at time of issuance. It is the responsibility of any filler or user of steel drums and pails to ensure that the unique characteristics of products contained therein or any reformulation of products are accurately described to the drum and lining manufacturers. Customers, fillers and users should consult the appropriate professional for assistance in compliance with the responsibilities outlined hereunder.